Not much to report here and there won't be much work going on for a few days as I am leaving Sunday to drop off my 110 pickup to it's new owner and pick up the Dormobile and stop by Rovers North for some parts. As for the 110, a note of caution: I bought the rig from Rovers Out East in North Carolina, they often advertise on Ebay, please do not confuse them with a similarly named, very high-quality company in Maine. I would not do business with them again and highly regret not taking my wife's advice and taking the time to go inspect the vehicle. Be wary my friends. BTW, the new owner has been fully informed of its faults by me and is prepped to deal with them. If you ever consider buying from ROE, please drop me a note BEFORE you do and I'll be happy to fill you in on my experience.
I'll post photos of the trip East and the "new" rig when I pick it up.
Friday, November 12, 2010
Thursday, November 11, 2010
November 10 2010
Here's the status as of the 11 of November: Breakfast and Bulkhead off the chassis, many, many, more bolts undone.
One of the biggest PLEASANT suprises so far is the ease of which the big bolts holding the bulkhead to the chassis came loose and came out. Frankly it looks as if they were coated with grease of some sort on installation. I had planned on having to heat and beat them out with a great expenditure of effort and burned and bleeding appendages.
Vibrating De-Ruster Update: I had mentioned in the last post a few cleaning fluids to use in the V-DR - forget all that - we're trying to de-rust right? Well, then use a de-rusting solution, works a treat. Turns one fish into many. The bolts come out looking like new, I can't believe I didn't think of it sooner, but am glad I did, de-rusts better in about a fourth the time!
Archeology Update:
What do you find behind the instrument panels of an old Rover? (besides the obligitory mouse nest)
- 8 Cents - 3 pennys, one nickel
- A Zippo lighter
- A few ciggy butts
- An ooold AA battery
- An unsused brake Master Cylinder kit
- Assorted nuts and bolts
- A fuse - unblown
- An old TV tube (no, not the CRT) I feel compelled to explain what this is - ah, just google it
- Hickory nut shells that the mouse enjoyed the contents of
- End cap off an old flashlight
- Dirt
I had been wondering how on Earth the thing could still smell like mouse piss after being taken nearly completely apart and beind steam-cleaned within an inch of it's life - I had forgotten about the standard-issue mouse-crib behind the instrument panel.
Here's what it looks like now:

I'll be doing some detail dissasembly and clean up in the next couple of sessions and getting the sandblasting and welding lined up for the bulkhead. The bed will come off next and some serious chassis clean up done.
Check this out:
 Woke up to a gorgeous sunrise yesterday, just had to share it!
One of the biggest PLEASANT suprises so far is the ease of which the big bolts holding the bulkhead to the chassis came loose and came out. Frankly it looks as if they were coated with grease of some sort on installation. I had planned on having to heat and beat them out with a great expenditure of effort and burned and bleeding appendages.
Vibrating De-Ruster Update: I had mentioned in the last post a few cleaning fluids to use in the V-DR - forget all that - we're trying to de-rust right? Well, then use a de-rusting solution, works a treat. Turns one fish into many. The bolts come out looking like new, I can't believe I didn't think of it sooner, but am glad I did, de-rusts better in about a fourth the time!
Archeology Update:
What do you find behind the instrument panels of an old Rover? (besides the obligitory mouse nest)
- 8 Cents - 3 pennys, one nickel
- A Zippo lighter
- A few ciggy butts
- An ooold AA battery
- An unsused brake Master Cylinder kit
- Assorted nuts and bolts
- A fuse - unblown
- An old TV tube (no, not the CRT) I feel compelled to explain what this is - ah, just google it
- Hickory nut shells that the mouse enjoyed the contents of
- End cap off an old flashlight
- Dirt
I had been wondering how on Earth the thing could still smell like mouse piss after being taken nearly completely apart and beind steam-cleaned within an inch of it's life - I had forgotten about the standard-issue mouse-crib behind the instrument panel.
Here's what it looks like now:

I'll be doing some detail dissasembly and clean up in the next couple of sessions and getting the sandblasting and welding lined up for the bulkhead. The bed will come off next and some serious chassis clean up done.
Check this out:

Monday, November 8, 2010
November 7
Since the last post we've done more stripping, more dissasembly and more thinking about the plan. At this point, I am going for a decent looking, functional truck, not a show winner. I've decided the front outer wing panels are going to take too much time for me to straighten, so I've ordered new ones and we'll save these for later attention and another project. Here's what it looked like at the night of November 4, 2010:

You know, this may sound funny, but even though removing the bondo has revealed the true denty-ness of this truck, I have to say that it already looks better, take a look at the photo on the right and the one above and see if you don't agree. At this point, most of the galvanized cappings are off, mostly stripped, and a minor amount of panel beating done. Oh, and about that beating.....
 The evil end is on the right. I won't say there's not a place for it if used judiciously, but it can do a lot of hard-to-undo mayhem.
Proceeding on, here's a few tidbits: the bolts holding the sill panels on are some of the most rusty and difficult to remove - quite a frustration for a simple thing. I would recommend several days of penetrant soaking, I only allowed a few hours.
A FEW NOTES ON STRIPPING:
I've used two different strippers, the EFS-2500 and Citristrip you can get at the hardware store. Both work pretty well, Citristip smells better, EFS-2500 stays wet much, much longer and is less messy to remove. C-S kind of gets crumbly, where EFS lifts the paint and it comes off more "together". I would not want to do a whole truck with C-S, but for small jobs I would go with it if I didn't have the EFS on hand. I did find quite by accident that EFS is somehow extra-activated by sunlight. We put some on the bed and in a bit found that the paint on the same panel was jumping off in the light, but hadn't changed in the shade - we quickly oriented the truck to take advantage! I am convinced that if you could park your Rover in a greenhouse and spray it with EFS on a sunny day, your battle against paint would be over by days-end. Seriously.
 My favorite stripper....
The toughest paint on the truck is the original paint, but I will say that EFS and sunlight will kick it's ass.
One thing that you find getting into a project like this is that you're getting into Land Rover Archeology. In this case, the truck's been used pretty hard, scraped a couple of trees, cab top beat to hell, front wings, used to beat up someone a lot bigger (read: the wings lost), yet multiple people have loved the truck. There was three coats of exterior paint, someone took the time to paint the interior and the bed black prior to the last coat of overall red, along with the last painting, considerable effort was put into plastic surgery to restore that youthful appearance, there was a home-crafted headliner, there were auxillary taillights added. But then there was the sadistic love applied with a grinder. A lot of this stuff makes you scratch your head, but to each their own.
Here's where it's at as of November 6:
 Today, November 7, I put on and removed the last coat of stripper - YAAAY! Now the truck will move to the next bay in the garage so I can get on the lift for final dissasembly. The bulkhead and breakfast will come off for sandblasting, a bit of welding on the bulkhead, and powdercoating. The bed will come off and more panel beating done, the chassis will be cleaned, de-rusted and a new rear crossmember welded on. The cappings and other galvy parts will go to the galvanizers later in the week.
TOOL TIP:
I bought one of the Eastwood vibrating de-ruster machines, and I have to say there's no better way to polish your nuts. This is the way things look going in:
 And here's the way they come out:


You know, this may sound funny, but even though removing the bondo has revealed the true denty-ness of this truck, I have to say that it already looks better, take a look at the photo on the right and the one above and see if you don't agree. At this point, most of the galvanized cappings are off, mostly stripped, and a minor amount of panel beating done. Oh, and about that beating.....

Proceeding on, here's a few tidbits: the bolts holding the sill panels on are some of the most rusty and difficult to remove - quite a frustration for a simple thing. I would recommend several days of penetrant soaking, I only allowed a few hours.
A FEW NOTES ON STRIPPING:
I've used two different strippers, the EFS-2500 and Citristrip you can get at the hardware store. Both work pretty well, Citristip smells better, EFS-2500 stays wet much, much longer and is less messy to remove. C-S kind of gets crumbly, where EFS lifts the paint and it comes off more "together". I would not want to do a whole truck with C-S, but for small jobs I would go with it if I didn't have the EFS on hand. I did find quite by accident that EFS is somehow extra-activated by sunlight. We put some on the bed and in a bit found that the paint on the same panel was jumping off in the light, but hadn't changed in the shade - we quickly oriented the truck to take advantage! I am convinced that if you could park your Rover in a greenhouse and spray it with EFS on a sunny day, your battle against paint would be over by days-end. Seriously.

The toughest paint on the truck is the original paint, but I will say that EFS and sunlight will kick it's ass.
One thing that you find getting into a project like this is that you're getting into Land Rover Archeology. In this case, the truck's been used pretty hard, scraped a couple of trees, cab top beat to hell, front wings, used to beat up someone a lot bigger (read: the wings lost), yet multiple people have loved the truck. There was three coats of exterior paint, someone took the time to paint the interior and the bed black prior to the last coat of overall red, along with the last painting, considerable effort was put into plastic surgery to restore that youthful appearance, there was a home-crafted headliner, there were auxillary taillights added. But then there was the sadistic love applied with a grinder. A lot of this stuff makes you scratch your head, but to each their own.
Here's where it's at as of November 6:

TOOL TIP:
I bought one of the Eastwood vibrating de-ruster machines, and I have to say there's no better way to polish your nuts. This is the way things look going in:


Just remember to re-sack your nuts after polishing... and tattoo your bag with the name of the place they go on the truck. I have found that adding a bit of cleaner into the water in the vibrator does seem to work a bit better than water alone. I have tried a small bit of GoJo, 409, and Oil Lift. GoJo works ok, foams a little, 409 works good, foams a lot, oil lift does not foam and works great. BTW, oil lift is a great product, became a beliver after de-oiling the fueselage of my Stearman with it. Awsome stuff. Cleaning the bolts and other hardware is a must, either that or replace them all. I prefer to use the originals, I just don't like the look of hardware-store bolts on these things, plus, it's a whole lot easier and nicer to re-assemble everything with clean stuff, and you'll save back the price of the machine and more by not having to buy repacements. Of course you'll not avoid replacing some as I have twisted apart several bolts, and there are some already missing. Right now this thing is running 24/7, Land Rovers have a lot of nuts, and there's a lot of nuts that have Land Rovers...
So that's where it's at as of Nov. 7. Next will be more intricate disassembly and repair of components, but we're nearing the turnaround point, always a good thing to look forward to.
Wednesday, November 3, 2010
Segment #3
I'll start this post off with a couple of notes: 1) As I think of them I'll add links to sites that I think can be of value to you that you may not find elswhere 2) keep in mind this blog site organizes things newest to oldest, so go to the right side and you can go in chonological order.
RANT #2
Ok folks, I'm no expert but with what little I do know I can tell you that nearly all of the little dents and most of the big dents in your Landy can be tapped out with a dolly and hammer, better yet instead of a hammer use a two foot piece of 2x2. If you're doing a restoration, invest in a decent set of tools and learn how to anneal the panels as well. So here you are with your new set of body hammers (and here's where the ranting starts) you need to understand two things: 1) That little pointy end of the hammer DOES NOT CONTAIN ALL THE MAGIC. Just because it looks different than your framing hammer and it's a "special" body hammer does not mean that you should actually use it to make a panel flat 2) I did say TAP TAP TAP - not - BAM BAM BAM. Heres what you get with the pointy pick end and a lot of bam bam bam:
 Now, does that look like an improvement? Hell no, that just created a BUTTOCKS-LOAD of work for the guy that wants it right - AND - the perceived need for a TON of body filler. I cannot tell you how tired I am of seeing indiscriminate use of a pick hammer on Rover panels.
As I move forward, I'll be showing you what can be done when you stop and think about the dent, evaluate the tools you have and take a reasoned approach to straightening the panels on your little gem.
RANDOM TIP:
Rusted-on door tops: Soak 'em with your favorite brand of penetrating oil for a couple of days then use heat, lots of heat, and probably a few loving taps with your favorite 5lb "pursueder". CAUTION: Be thoughtful with the use of the heat as right next to the nut of the top is AL, which will melt - some type of heat shield is a good idea.
Back to the work at hand:
You'll notice that I have used stipper to rid the truck of most of the body filler. Crazy? Dumb? I can't say, but I can tell you the EFS-2500 does a good job of lifting it. I also hate a bunch of plastic dust going all over the shop, and I hate more getting into the AL of the body with a sander. So, for the most part it was stripped, there were a few areas where I took off quite a bit with a sander then finished with the stripper. In the end, it's all gone so sit back and crack a cold one and smoke your favorite leaf while you pat yourself on the back. I haven't weighed the filler and paint yet, but I would guess nearly 50lb came off the truck - no shite.
In the next post, I'll show some photos of the end results and some of the tools used.
RANT #2
Ok folks, I'm no expert but with what little I do know I can tell you that nearly all of the little dents and most of the big dents in your Landy can be tapped out with a dolly and hammer, better yet instead of a hammer use a two foot piece of 2x2. If you're doing a restoration, invest in a decent set of tools and learn how to anneal the panels as well. So here you are with your new set of body hammers (and here's where the ranting starts) you need to understand two things: 1) That little pointy end of the hammer DOES NOT CONTAIN ALL THE MAGIC. Just because it looks different than your framing hammer and it's a "special" body hammer does not mean that you should actually use it to make a panel flat 2) I did say TAP TAP TAP - not - BAM BAM BAM. Heres what you get with the pointy pick end and a lot of bam bam bam:

As I move forward, I'll be showing you what can be done when you stop and think about the dent, evaluate the tools you have and take a reasoned approach to straightening the panels on your little gem.
RANDOM TIP:
Rusted-on door tops: Soak 'em with your favorite brand of penetrating oil for a couple of days then use heat, lots of heat, and probably a few loving taps with your favorite 5lb "pursueder". CAUTION: Be thoughtful with the use of the heat as right next to the nut of the top is AL, which will melt - some type of heat shield is a good idea.
Back to the work at hand:
You'll notice that I have used stipper to rid the truck of most of the body filler. Crazy? Dumb? I can't say, but I can tell you the EFS-2500 does a good job of lifting it. I also hate a bunch of plastic dust going all over the shop, and I hate more getting into the AL of the body with a sander. So, for the most part it was stripped, there were a few areas where I took off quite a bit with a sander then finished with the stripper. In the end, it's all gone so sit back and crack a cold one and smoke your favorite leaf while you pat yourself on the back. I haven't weighed the filler and paint yet, but I would guess nearly 50lb came off the truck - no shite.
In the next post, I'll show some photos of the end results and some of the tools used.
Let's get to work
Ok, so let's get started on this thing. Based on my overall evaluation here's what we have - really bad paint, Runs well, brakes have problems, transmission and drive train quiet, no real funky "owner enhancements", Bulkhead remarkably good, a rust hole on the bottom driver footwell, and the chassis solid other than the rear x-member. Not bad, but, uh... there's a little bondo here and there, nothing too bad.
Step 1, remove the lights, etc. in prep for stripping paint. I figured that the paint prep was going to take me the longest, so might as well start there. Ordered a 5 gallon pail of EFS-2500 stripper, approved for aircraft, so I figured good for the Birmabright, plus the stuff is enviromentally friendly. Isn't "Enviromentally friendly" paint stripper an oxymoron?
Step 2, start applying stripper. Biggest mistake - not putting it on heavy enough the first time around, it gives you this result:
 Down to the primer - I wanted metal. And, you can start to see something that will cause me to create a rant here in a minute. Body Filler. Take a look at this:
 That ain't no Brimabright folks. I'm going Whaaa? Then WTF. Take a further look here:
 Yeah, that's right boatloads of bondo.
BEGIN RANT #1:
WTF!! This is the craziest thing I have ever seen, there are only TWO PANELS on this entire truck that are completly devoid of BODY FILLER - the breakfast and the bulkhead. The sad shame here is that there was BF in places where there was PREFECTLY GOOD METAL underneath. There was filler on the cappings, there was filler on the door tops. AND DOES EVERYONE USE THEIR CAB TOP TO PICK APPLES FROM? FOLKS!!! Hear me! it is WORTH the time to learn a little about PANEL BEATING, so many of the dents on this truck could have literally been removed with ten seconds of hammer and dolly work each vs. APPLYING 1/4 INCH of bondo - on THE WHOLE TRUCK!
 Why was there a 1/4 inch of filler on this cab-top side? Beats me.
 Denty, denty cab top. Does every one think it's a good idea to take the cab top off, hook it behind the truck in the winter and take their friends for a sled ride in the cornfields? Has every cab top had a tree fall on it? Are Land Rovers with cab tops meterorite magnets?
I'll save rant #2 for the next post.
Step 1, remove the lights, etc. in prep for stripping paint. I figured that the paint prep was going to take me the longest, so might as well start there. Ordered a 5 gallon pail of EFS-2500 stripper, approved for aircraft, so I figured good for the Birmabright, plus the stuff is enviromentally friendly. Isn't "Enviromentally friendly" paint stripper an oxymoron?
Step 2, start applying stripper. Biggest mistake - not putting it on heavy enough the first time around, it gives you this result:


BEGIN RANT #1:
WTF!! This is the craziest thing I have ever seen, there are only TWO PANELS on this entire truck that are completly devoid of BODY FILLER - the breakfast and the bulkhead. The sad shame here is that there was BF in places where there was PREFECTLY GOOD METAL underneath. There was filler on the cappings, there was filler on the door tops. AND DOES EVERYONE USE THEIR CAB TOP TO PICK APPLES FROM? FOLKS!!! Hear me! it is WORTH the time to learn a little about PANEL BEATING, so many of the dents on this truck could have literally been removed with ten seconds of hammer and dolly work each vs. APPLYING 1/4 INCH of bondo - on THE WHOLE TRUCK!


I'll save rant #2 for the next post.
How this came to be
Well, here we go. I'll use this blog to document the refurbishment of not one, but two Series Land Rovers.
New Plan: So after a good hard look at the chassis, it really is in good shape excepting the rear cross member - so, call Rovers north and change the chassis order from a 109 regular to a 109 station wagon (the Dormobile will need a chassis for sure) they were very accomodating, as they should be with such a big tuna on the hook. Diesel - now going to the Dormobile, the red one is a good runner anyway and isn't smoking or making bad noises. Oh, and no more RoverDrive either, (Sorry red) Sound like a plan - a very skecthy plan, but a plan nevertheless.
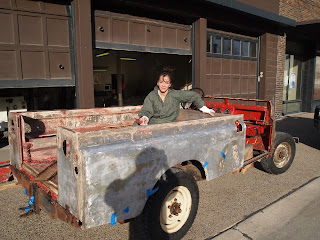
Now at this point you might ask: "wouldn't it be a better idea to just do one at a time?" I might have considered that if the red one wasn't looking like this at the time I clicked the Dormobile buy-it-NOW:

Two! Sheez, what am I thinking? Positively, my friends, positively, and let's keep it that way. Here's the deal, I wanted a Series pickup earlier in the year, and came across the red "beauty" you see in the photo and did the deal. The original intent was to completely overhaul the truck, galvy frame (chassis - gotta get it right here), 200Di engine replacement, RoverDrive, etc. Just as I start in on the project, now comes this Dormobile up on ebay with a buy-it-NOW option, wife took one look said "buy it!" (you should be so lucky), so wham, clicked the button, and did the deal. Ooookkkay, re-sort the plan for the red one because I've just added a whole lot more work to the slate.
New Plan: So after a good hard look at the chassis, it really is in good shape excepting the rear cross member - so, call Rovers north and change the chassis order from a 109 regular to a 109 station wagon (the Dormobile will need a chassis for sure) they were very accomodating, as they should be with such a big tuna on the hook. Diesel - now going to the Dormobile, the red one is a good runner anyway and isn't smoking or making bad noises. Oh, and no more RoverDrive either, (Sorry red) Sound like a plan - a very skecthy plan, but a plan nevertheless.
Now at this point you might ask: "wouldn't it be a better idea to just do one at a time?" I might have considered that if the red one wasn't looking like this at the time I clicked the Dormobile buy-it-NOW:

Partly stripped, and, I do want a pickup too, and I don't want a partly disassembled and wholly unusable truck siting around. So, we can do it, we can, I'm sure we can, It will be OK, it will be fun, and all types of other positive self-affirmation.
Subscribe to:
Posts (Atom)